How To Install / Upgrade / Uninstall Advanced Host Monitor
How To Install/Update/Repair
Advanced Host Monitor |
 youtube demo
(installation just 15 seconds, then this video shows how to enable remote access, set user accounts, create tests and actions, etc) youtube demo
(installation just 15 seconds, then this video shows how to enable remote access, set user accounts, create tests and actions, etc)
Run installation program, answer "Yes" on the prompt to install Advanced Host Monitor software. Setup wizard will
then ask you to choose between the two available types of installation.
- "Install" - Use this option either for a fresh new installation or to completely replace
an old version. With this option the newer installation will overwrite all files of previously installed (if any)
version of Advanced Host Monitor unless you selected different disk folder for installation.
- "Update/repair" - Use this option to update previously installed Advanced Host Monitor
to a newer version while keeping all user settings unchanged. Also you may use this option to repair installed
software when some files were removed by mistake or after virus attack. Setup program will overwrite all
executable modules of previously installed HostMonitor, help files, etc; all user settings will remain intact.
After choosing Install or Update mode click "Next" button and select one of the following options:
- Install Advanced Host Monitor and utilities;
- Install Remote Control Console only;
- Install Remote Monitoring Agent only
Last 2 options provide quick way to install or update RCC and RMA
modules only; while 1st option allows you to choose various sets of applications.
If you continue with selected by default "Install/Update Advanced Host Monitor and utilities" option then setup program allows you to choose 2 different folders for Advanced Host Monitor package:
- one folder for executable files (by default this is the folder where the Advanced Host Monitor was previously installed on your system or \Program Files\HostMonitor\ folder for first time installation);
- another folder for configuration files
E.g.
- *.EXE, *.DLL, *.DOC files can be stored in C:\Program Files\HostMonitor\
- *.INI, *.LST, *.HML files, reports, logs and HM script files can be located at C:\ProgramData\HostMonitor\
Note: if you want to use several different versions of the software on the same system (for testing purpose) then you need to install configuration files using <same path> mode.
Also, please see notes regarding UAC and Virtualization
There is also a choice of 4 setup packages:
- "Lite/Standard" - only HostMonitor, HML Manager, samples and help files will be installed.
- "Professional" - HostMonitor, HML Manager and Log Analyzer will be installed.
- "Enterprise" - All components (except Remote Monitoring Agent) will be installed.
- "Custom" - use this option when you need to install some specific utilities, e.g. install RMA, RCC and Log Analyzer.
Beside each setup package there is a help button. Press this button to bring up the reminder about the components that will be installed.
After choosing the destination path and setup package, press the "next" button of the setup wizard. Now, if you have
chosen "custom" setup package the next screen will ask you to select which components to install (selection step is
skipped if you have chosen "Lite/Standard", "Professional" or "Enterprise" packages). The next screen will show you
a summary of all options you have just chosen. If you change your mind then press "back" button to step back and
adjust your settings.
Finally press "Install" button to start installation. When the final stage of installation will finish you will be
prompted to put the HostMonitor icon on the desktop, create HostMonitor program group and to run HostMonitor right
after the installation. Check these options according to your desire and press "Done" button.
|
How To Uninstall
Advanced Host Monitor |
Method 1: Run uninstall.exe from the HostMonitor directory (or from the HostMonitor program group)
and click the "Start" button.
Method 2: Open the Windows Control Panel, double click the "Add/Remove Programs" icon,
select "HostMonitor" from the list and click the "Add/Remove" button.
|
UAC and Virtualization
If you are using Windows Vista or newer Windows system, UAC is enabled and you setup software using separate application/data
folders then most applications disable virtualization.
In addition to HostMonitor and RMA Manager (these applications disable virtualization regardless of location), the following modules
disable virtualization when data files located in separate folder:
- MIB Browser
- Log Analyzer
- Log Visualizer
- Web Service
- Telnet Service
- WatchDog
- ProcessMeter
- WMI Explorer
- HML Manager
If you install software using single destination folder below Program Files\ then configuration files can be virtualized by UAC.
RMA for Windows modules work differently:
- if you install new copy of RMA using setup program, it will disable virtualization regardless of data files location (RMA agent always keeps rma.ini file in the same folder);
- if you update existing old RMA installation using setup program or RMA Manager, it will keep current settings (in such case rma.ini file can be virtualized depending on UAC settings and installation folder location).
Note: you may enable/disable virtualization for RMA agent using the following registry key:
- on 32bit Windows: HKLM\Software\KS-Soft\HostMonitor\RMAVirtualizationOff
- on 64bit Windows: HKLM\Software\Wow6432Node\KS-Soft\HostMonitor\RMAVirtualizationOff
There is another UAC-related problem: if software is running as Win32 service, it may not have "write"
access to data folders (this depends on version of the system, location of the folder and UAC settings). HostMonitor may not be able
to store settings even if you provide admin account for the service (admin - user that belongs to Administrators and Users groups).
There are several possible solutions:
- disable UAC;
- use BUILT-IN "administrator" account to start service;
- add "write" and "modify" permissions to Users group.
That's why setup program assigns "write" and "modify" permissions to Authenticated Users group when you install (not update)
software on Windows Vista+ using separate folder for data files.
If you are sure you will run HostMonitor as service under built-in administrator account or UAC always will be disabled or HostMonitor
will be started as application only, then you may adjust folder permissions (for better security) after installation and initial
configuration.
Useful links:
Why administrator gets access denied
Inside Windows Vista UAC
Inside Windows 7 UAC
How to install HostMonitor as Win32 Interactive service
1) Install Advanced Host Monitor package on your system. If you already have Advanced Host Monitor installed, skip this step.
2) Start HostMonitor (hostmon.exe, not host-mon.exe) with the command line parameter "/InstallService" (hostmon.exe /InstallService).
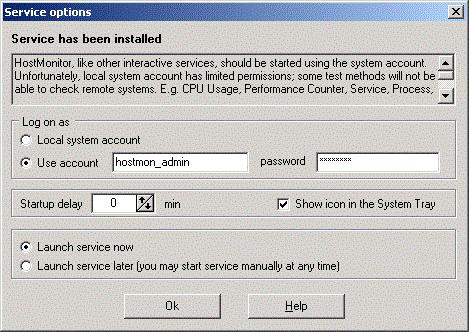
HostMonitor will install itself as a service and display "Service options" dialog. "Service options" dialog
allows you to specify some important parameters and then lauch the service. If you do not plan to start service
right away, select "Launch service later" option and click Ok. In such case service will be started at system
startup. Also you may start service at any time using standard Windows "Services" applet or command line like
"net start hostmonservice".
youtube demo
IMPORTANT NOTES:
Note #1: "Local system" account does not allow to monitor remote systems using test methods like
CPU Usage, Process, Service, NT Event Log, etc. If you need these tests, you will need to assign a special user account
using "Service options" dialog. Also, you may change this account later using options located on the Service
page in the Options dialog. In this case HostMonitor will impersonate the security context of the user.
Windows XP and Windows Server 2003 related note: do not change the account using Windows applet "Services". If you do so, HostMonitor service
may be unable to interact with the desktop and you will need to use RCC as remote management application.
Windows Vista+ related note: Windows services cannot interact with desktop so you may provide user account for the service using HostMonitor
options or using Windows "Services" applet.
Note #2: In some cases Win32 service is unable to interact with desktop. There are 3 most common reasons:
- You have disabled "Allow service to interact with desktop" option;
- Service is running on remote system and you are using Terminal Service to login to that system;
- You are using Windows Vista, Windows 7, 8, 10 or Windows Server 2008-2019
It's pretty easy to enable "Allow service to interact with desktop" option but how to manage HostMonitor that is
running as service on remote system / on Windows Vista?
Use Remote Control Console (RCC) that allows you to manage
HostMonitor started on local or remote system in service or application mode.
HostMonitor started on Windows Vista+ allows 1 additional LOCAL RCC connection.
Note #3: There is common mistake - install HostMonitor as service, start service, then start application.
Please DO NOT start several instances of HostMonitor on the same system using the same installation folder and
configuration files. If you do so, several instances will work simultaneously, monitor the same target systems,
and launch the same actions. If you modify test settings or profiles using 2nd instance of the software
(application), 1st instance (service) will not apply modifications until you restart service. Also, your
log files and statistical information will not be accurate when you are running several instances of the
monitor using the same log files.
That's why HostMonitor warns you when you are trying to start application while service is running as well, then it may stop service before
launching application.
Note #4 (obsolette, we do not support Windows NT 4.0 anymore): We do not recommend installing HostMonitor as a service under Windows NT 4.0. At least not as an
interactive service. In the case you really need to start HostMonitor as a service on Windows NT, please,
disable the "Allow service to interact with desktop" option for HostMonitor service (option provided by Windows
Services applet). In this case you will not be able to see HostMonitor's icon in the system tray.
Database monitoring
In order to monitor Oracle servers HostMonitor uses the Oracle Call Interface (OCI.DLL), you should have the Oracle client software installed on the computer.
The same is true for other SQL servers - please install the client software for testing your SQL server.
HostMonitor uses the following DLLs:
- gds32.dll to monitor Interbase connections
- fbclient.dll to check Firebird SQL server
- ntwdblib.dll to monitor MS SQL
- libmysql.dll to monitor MySQL
- libmariadb.dll to check MariaDB
- oci.dll to check Oracle
- libpq.dll to monitor PostgreSQL
- libsybdb.dll to monitor Sybase
Important: some versions of MySQL, Oracle client software and ODBC drivers have critical bugs and may lead to various problems.
Please check the following notes: Database client software notes, ODBC known problems
Process monitoring
To monitor processes on a remote Windows system, make sure you have the Remote Registry service started on the remote system (to monitor processes HostMonitor must have access to the registry). On Windows 2000 this service is installed by default, for Windows NT you can find this service in the Resource Kit.
Technical Info:
If you wish to move the program from one computer to another you do not need to
re-implement all the lists and settings again. Simply copy the program files from
one computer or install the program on another computer and then copy only the files containing your settings.
| File | Used by | Description |
| Hostmon.chm | All applications | Help file |
| Hostmon.exe | HostMonitor | Main executable module |
| LogsMan.exe | Log Analyzer | Main executable module |
| Rma.exe | RMA | Main executable module |
| Rma_cfg.exe | RMA | Configuration utility |
| Rma_mgr.exe | RMA Manager | Main executable module |
| Telnetservice.exe | Telnet Service | Main executable module |
| Webservice.exe | Web Service | Main executable module |
| | | |
| Hostmon.ini | HostMonitor | Includes all global parameters (almost all of them represented in the Options dialog). You can create different ini files and specify the name of ini file in the command line when starting HostMonitor |
| HML_Mgr.ini | HML Manager | Options and settings |
| Logsman.ini | Log Analyzer | Options and settings defined in Options dialog |
| Rma.ini | RMA | Options and settings |
| Rma_Mgr.ini | RMA Manager | Options and settings |
| Telnetservice.ini | Telnet Service | Options and settings |
| Webservice.ini | Web Service | Options and settings |
| | | |
| Actions.lst | HostMonitor | Contains the action profiles |
| Agents.lst | HostMonitor
RMA Manager | List of Remote Monitoring Agents |
| Custmenu.lst | HostMonitor | Custom menu profiles |
| Holidays.lst | HostMonitor | List of holidays (for schedules) |
| Larep.lst | Log Analyzer | Report profiles |
| MailList.lst | HostMonitor | Mail templates |
| Palettes.lst | HostMonitor | Color schemes |
| Prbypass.lst | HostMonitor | Proxy bypass list |
| RepPList.lst | HostMonitor | Report profiles |
| Schedule.lst | HostMonitor | Contains the list of schedules |
| Services.lst | HostMonitor | List which includes TCP port descriptions |
| Sscripts.lst | HostMonitor | Shell Script profiles (used by Shell Script test) |
| Udvmacro.lst | HostMonitor | User defined macro variables |
| Users.lst | HostMonitor | User profiles (operators) |
| Wsuserprof.lst | Web Service | User profiles (preference settings for each user) |
| Examples\ | - | This directory contains different examples: |
| Example1.hml | - | A sample HML (test list) file. It is recommend that you save your test configurations in a diferent HML file rather than just modify the one shipped with the program, otherwise your changes will get lost during the upgrade process as the sample HML file will be overwriten with the newest version available. |
| Errorlev.exe | - | Example of program for external test |
| Import1.txt | - | The sample import file |
| Script1.hms | - | Example of HMS sript |
| AutoRefresh.html | - | This file can be used as an external header for HTML reports. It contains command to auto refresh HTML. Your browser will be refreshing the page's contents at regular intervals |
| Summary.html | - | Another external header, will display tests' statuses summary
|
| StdHeader.html | - | Just an example of external header for HTML reports, can be used as a base for creating your own headers |
| CompactHeader.html | - | Sample of external header for Compact HTML report |
| StdFooter.html | - | Just an example of external footer for HTML reports, can be used as a base for creating your own footers |
| Summary2.html | - | Another external footer, will display tests' statuses summary |
| Examples\LAReports\ | - | Directory contains samples of the external header, footer, template for Log Analyzer's Report Manager |
| Examples\Scripts\ | - | Directory contains sample scripts for Script test |
Troubleshooting:
If you are using HostMonitor with a license key that had been generated illegally
or using a cracked version of HostMonitor, the program will become unstable causing
frequent software problems and crashes.
If you have any questions, please visit the online forum.
There you can find answers to a lot of questions. If not, please do not hesistate ask, we will be happy to help you.
support@ks-soft.net