Network discovery
Menu LANs provides access to new function - now you may setup network records for scanning and HostMonitor or RMA will find all systems
in the LANs (well, at least systems that can be discovered by ICMP, TCP, SNMP, DNS, MAC requests).
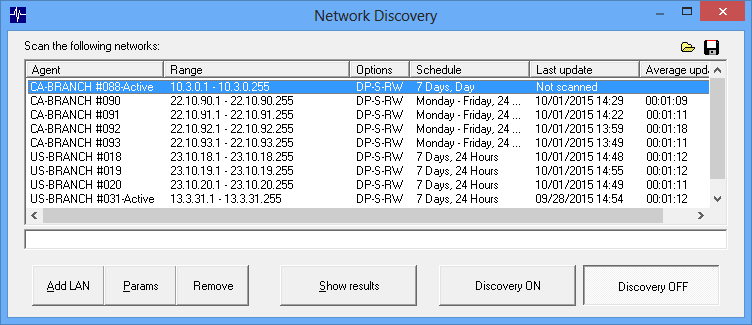
Networks can be scanned by HostMonitor itself, Active RMA or Passive RMA for Windows. You may set agent, IP range, schedule, short description and scanning options:
- consider host as available when either:
- hostname can be retrieved;
- host responds to ping;
- host responds on specific TCP port
- timeout for Ping, TCP connects and SNMP requests
- SNMP port
- check if there is SNMP agent using one or list of SNMP credentials
- check additional TCP ports
- check if host responds to RPC calls
- check if host responds to WMI calls
IP range can be set like 192.168.1.0/24 or 192.168.1.1-192.168.1.255. Also HostMonitor may show LAN information retrieved from domain controller.

If you decide to use SNMP check (very useful option that allows to detect type of various network devices), please make sure
you setup SNMP credentials used in your network (click SNMP Profile button and setup credentials).
If network discovery started, HostMonitor and Remote Monitoring Agents will scan selected networks in background and update
database when any changes detected. At any time you may open "Network map" window and see up to date map of your network.
Note: HostMonitor and RMA agents do not use a lot of system resources for such scan (even for large networks) so changes
in network can be detected with some delay (e.g. new system in network will be detected 5 min after system turned on
- exact time depends on number of LANs, number of hosts in the LAN and other parameters).
Network map
Network map window shows all hosts within selected LAN, HostMonitor paints cells in different colors depending on host properties
and displays icons when possible (when size of the window is big enough for selected network), so you can easily identify Windows
and Unix systems, CISCO routers, Apple devices, Printers, etc.
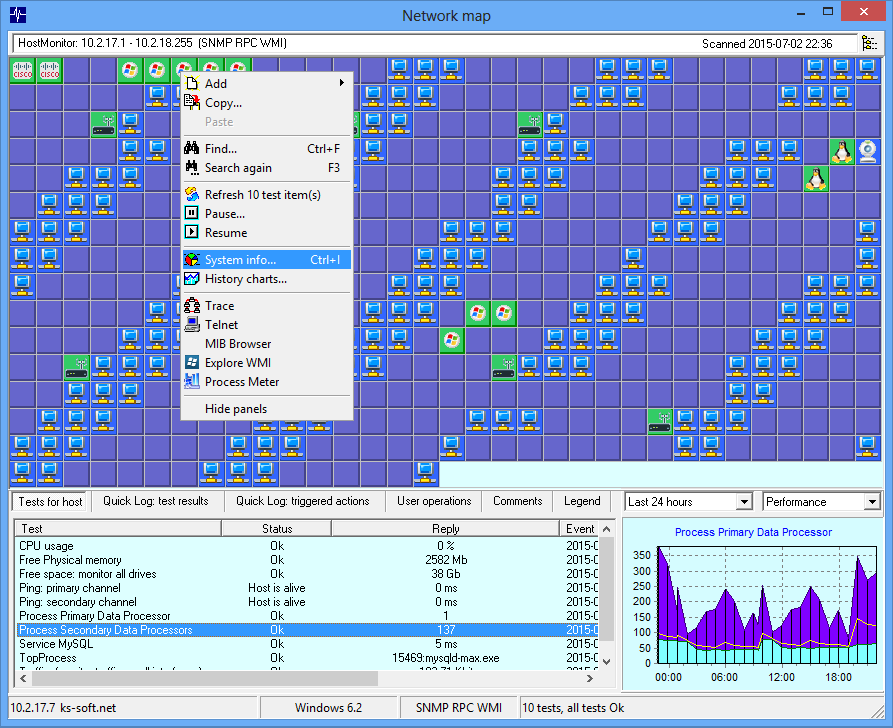
If there are some test items related to selected host, HostMonitor will group all test items related to this device and display
tests in "Tests for host" list. HostMonitor will paint hosts in yellow or red when any test related to the host has "unknown" or
"bad" status accordingly.
- Tests for host - all test items related to the host
- Quick Log: test results - latest test results for all test items related to the host
- Quick Log: actions - latest actions triggered by all test items related to the host
- User operations - list of latest operations such as paused, disabled tests...
- Comments - user comments
- Chart for selected test item
Performance chart shows graph using information about minimum, maximum and average reply values of the test item over selected time interval. Availability chart - shows graph using information about alive/dead/unknown test results ratio over selected time interval
You may choose any of the following time periods to display:
- Today
- Yesterday
- Last 24 hours
- Last 48 hours
- This week
- Last week
- Last 7 days
- Last 14 days
- This month
- Last month
- Last 30 days
- Last 60 days
- This year
- Last year
- Last 12 months
- Last 24 months
Status bar shows information related to selected host: IP address, hostname, OS version, protocols supported by target host,
number of test items related to the host.
There are popup menus in upper and lower panes.
Upper pane menu relates to host and group of tests. E.g. you may add new test item related to the host, refresh or pause all items
related to this host, display various information collected from target host. Also you may create your own menu items with
associated commands. For more information, refer to Custom menu profiles section of this manual.
Most commands work similar to same commands available in main HostMonitor window however there are some distinctions:
Add test: when you add new test using Network Map window, HostMonitor automatically sets agent and target host
fields, SNMP Profile for SNMP related tests, etc. Also HostMonitor highlights menu items if target host supports
protocols necessary for such test (e.g. "Add"->"SNMP Get" item will be highlighted when target host supports SNMP protocol).
HostMonitor gray out menu items when target host does not support protocols necessary for the test or such test for target
host already created (e.g. "Add"->"Service test" item will be displayed in gray color when target host does not support
RPC protocol or protocol blocked by firewall); however it does not disable such items so you may create test if you need.
Also you may use advanced search with expressions like ("Windows 5" in "%OS%") and ("%WMI%"=="ON")
The following variables can be used for search or clone (copy) operations
| %hostname% | host name |
| %ip% | IP address of the host (IPv4) |
| %os% | OS running on target host |
| %mac_addr% | MAC address (available for systems located within LAN where HostMonitor or RMA installed) |
| %nc_vendor% | network card vendor |
| %snmp% | "on" when host responds to SNMP requests (otherwise "off") |
| %rpc% | "on" when RPC service detected |
| %wmi% | "on" when host responds to WMI requests |
| %type% | when HostMonitor can detect host type this variable returns one of the following values: router, printer, video, windows, unix, vmware, apple, cisco, juniper, bigip, netscaler, qnap, netapp, synology |
Lower pane menu allows you to operate with specific test items related to the host, e.g. Acknowledge test status,
Edit test properties, Enable, Disable, Refresh or Pause test item, etc. Also you may create your own menu items with
associated commands. For more information, refer to Custom menu profiles section of this manual.
- Set fixed IP
- Clear fixed IP
Replicator
HostMonitor version 10 comes with new built-in Replicator. You may select some host using Network map and choose "Copy" item from popup menu.
"Copy test" window will show all test items related to selected host
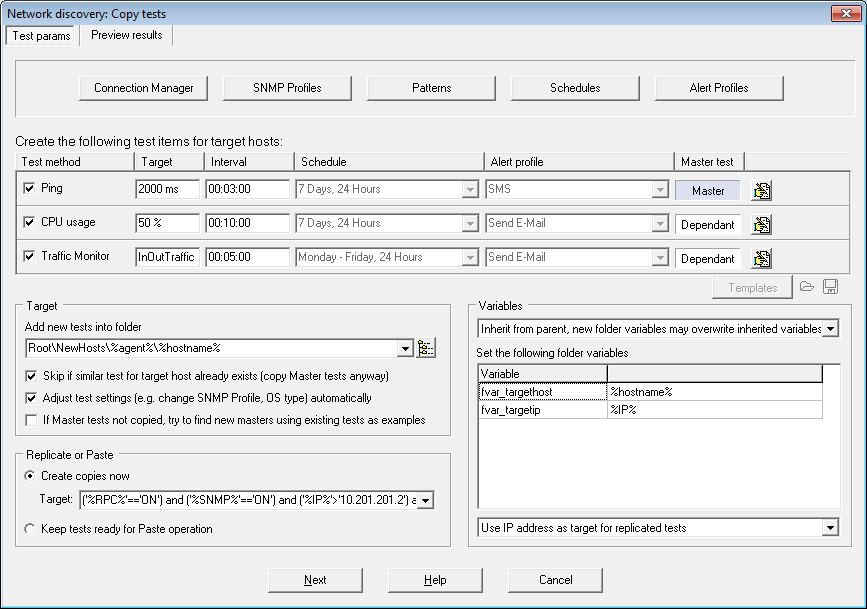
Then you can unmark some items, change test parameters and set options for replication process.
Add new tests into folder
This option tells HostMonitor where new tests should be located. Here you can specify static folder name (e.g. Root\MainOffice\) or you may specify folder using variables like Root\NewTests\%Agent%\%IP% - in this case HostMonitor will create new folder for each new target host (%IP% variable represents IP address of the host)
Skip if similar test for target host already exists
With this option enabled HostMonitor will check if similar test, related to target host, already exists and will not create another copy.
E.g. if there is TCP test that checks port 80 on hostA, HostMonitor will not add another TCP test for this port on hostA but it may
add TCP test that checks port 81 (when such test exist in "source" list). Also it will not duplicate tests that check some specific
file, ping tests with the same display and packet size options, and so on.
Note: Master tests (test items that have some dependant items) will be copied anyway.
Adjust test settings automatically
This option tells HostMonitor to adjust some settings according to target host OS and detected protocols. E.g. if you copy CPU Usage test
from Windows to Linux host, HostMonitor may change OS property from "Windows (RPC)" to "UNIX (SNMP)"; also HostMonitor may change
SNMP profile specified for the tests; change OS property for Memory tests; adjust Drive Free Space tests for Windows, UNIX or NetApp
devices and so on.
If Master tests not copied, try to find new masters using existing tests as examples
This option can be very useful when you already have set of test items related to target hosts but you want to replicate some new test methods.
If you copy just dependent items, this option tells HostMonitor to check test items located in target folder, find tests with similar
"master-pattern" and set the same masters for new test items.
Example: if you replicate Memory_A test that depends on 1 external Ping test and 1 internal TCP_A test (TCP_A and Memory_A tests check
the same host_A), then HostMonitor will try to find test related to target host_B that depends on 1 external Ping test and 1 internal
TCP_B test (related to target host_B). This way new Memory_B test (related to host_B) will depend on Ping and TCP_B masters.
If you replicate set of master and dependent items, then HostMonitor adjusts master-dependent relations regardless of this option.
There are 2 modes for replication:
- Create copy now
- Keep tests ready for Paste operations
Create copy now
Using this mode you should specify target hosts before you close "Copy tests" window. You may type target host name or IP address or use
complex expressions. For example you may tell HostMonitor to replicate selected tests for Windows systems with enabled WMI service
within 10.22.1.50 - 10.22.1.250 IP range using expression like
("%WMI%"=="ON") and ("%IP%">="10.22.1.50") and ("%IP%"<="10.22.1.250")
The following variables can be used in expression
| %hostname% | host name |
| %ip% | IP address of the host (IPv4) |
| %os% | OS running on target host |
| %mac_addr% | MAC address (available for systems located within LAN where HostMonitor or RMA installed) |
| %nc_vendor% | network card vendor |
| %snmp% | "on" when host responds to SNMP requests (otherwise "off") |
| %rpc% | "on" when RPC service detected |
| %wmi% | "on" when host responds to WMI requests |
| %type% | when HostMonitor can detect host type this variable returns one of the following values: router, printer, video, windows, unix, vmware, apple, cisco, juniper, bigip, netscaler, qnap, netapp, synology |
Then you may preview results, HostMonitor will show network map with highlighted target hosts. You may switch back to "Test params" page if you want to change something, you may start cloning procedure or you may cancel entire operation.

Keep tests ready for Paste operations
This mode works in different way - when you close "Copy tests" window HostMonitor will keep source tests in internal clipboard. At any time you may select some hosts using Network Map and select Paste item from popup menu. You may select hosts using current LAN or you may switch to another LAN and "paste" the same test items, this allows you to copy tests from one LAN to another (e.g. from LAN monitored by HostMonitor to LAN monitored by Remote Monitoring Agent).
Variables
You may use folder-related variables as parameters of test items (target host, path to the file, etc) and parameters of actions
assigned to these test items. For example you may define %fvar_IP% variable and use this variable for various test
items - specify %fvar_IP% as target address for Ping and Trace tests, use string like http://%fvar_IP%/database/index.cgi as URL
specified for HTTP test, check drive free space using \\%fvar_IP%\driveC path for UNC tests, etc. For details please
check Templates section of the manual.
- Set new variables
- Inherit all variables from parent folder(s)
- Inherit from parent, new folder variables may override inherited variables
When 1st or 3rd option is selected you may specify folder-level variables. You may use static values and you may use macro variables.
For example: if you set the following settings:
- Add new tests into folder: Root\NewTests\%IP%
- Create copies now, target ('%IP%'>='192.168.1.100') and ('%IP%'<='192.168.1.200')
- Set new variables:
- fvar_targetIP %IP%
Replicator will create 100 folders:
Folder path Variables
| Root\NewTests\192.168.1.100 | fvar_targetIP = 192.168.1.100 | |
| Root\NewTests\192.168.1.101 | fvar_targetIP = 192.168.1.101 | |
| ... | ... | |
| Root\NewTests\192.168.1.200 | fvar_targetIP = 192.168.1.200 |
Note: To add a new variable to the end of the list go to the last existing line and press Down Arrow key. Press INSERT button to insert a new line. Press CTRL+DEL to remove variable. Press F2 to edit variable.
Note: if target folders already exist, Replicator will not change folders settings so existing test items will not be affected.
Preferably use hostname as target for replicated tests
This option tells Replicator to use target host name for new tests related to the host. If hostname unknown, IP address will be used
Use IP address as target for replicated tests
With this option selected Replicator will use IP addresses for all new tests created by this copy operation.
Cloning process
What exactly happens when Replicator clones test items? This depends on test methods - there are 5 groups of tests:
| 1) RAS, SNMP Trap, ODBC and Active Script tests |
|
| 2) External test and Shell Script |
|
| 3) Mail Relay, E-mail, SOAP, OPC, HM Monitor |
|
| 4) URL, HTTP, File related test methods, Performance Counter, Memory, SNMP Get, VM systems |
|
| 5) other test methods |
|
Network Discovery and Replication great combination - now it's pretty easy to create thousand new test items for entire LAN or find couple systems that were not monitored by HostMonitor yet.
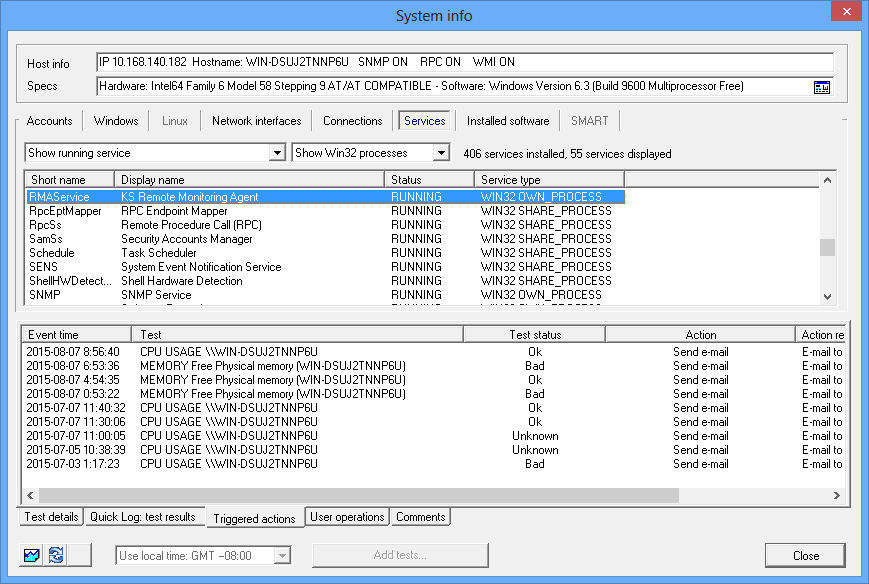
System info
System info function uses various protocols to collect data and shows information related to selected host. It can be called
from main HostMonitor window or from Network Map window using System Info popup menu item.

System Info window may show
- disk, CPU and memory usage on Windows systems;
- disk, memory usage and system load on Unix systems;
- memory usage and system load on some Cisco routers;
- network interfaces on various network devices (including Windows and Unix systems, routers, etc);
- opened TCP ports and established TCP connections;
- Windows services;
- installed software on Windows and Linux systems;
- hard drive status (SMART data) on Windows systems;
- processes that use most of CPU, memory or handles on Windows system
Also you may see all test items related to the host regardless where these items located within HostMonitor folders tree. Quick Log pages show test results and actions related to selected host and so on.
Chart shows performance and/or status related history; double click on chart opens Test History window.
You can perform operations with test items without leaving System Info panel:
- Acknowledge status
- Edit
- Refresh
- Pause
- Resume
- Disable
- Enable
- Check historical charts
- Check private logs (for HostMonitor and RCC connected to local HostMonitor)
Also you may check target host using built-in and external tools, e.g. start the following utilities:
- Trace
- Telnet
- MIB Browser
- WMI Explorer
- Process Meter
Accounts
When HostMonitor cannot find account related information (used for connection to target system) you can provide
SNMP profile and 2 user accounts manually. When you set new or change user accounts you may store these new accounts
using the following options:
Set accounts to network database
HostMonitor stores SNMP profile and user accounts in database managed by Network discovery utility. Existing test
items are not affected in any way.
Apply to database and ALL related tests
This option stores user accounts in database managed by Network Discovery as well. Also it changes account for test
items related to this host when "Connect as" test property is enabled. Plus this option changes or creates new records
for Connection Manager. It may create up to 6 new records (this may happen when you need to use different accounts for
WMI and RPC related tests and you are using test items with different format of "target" field - host name, IP address
and FQDN) but normally just 1 or 2 records will be modified.